
Claude Design is an AI design platform built into Claude that can take written directions and generate prototypes, pitch decks and landing pages. The program does not simply produce static images but rather interactive, editable designs that you can navigate through, change and export. The following guide provides step by step instructions on how to use Claude Design from loading a template through to publishing a live webpage.
What is Claude design?
At claude.ai/design, you can find Claude Design which combines an assistant for designers with an effective prototyping tool too! After you write a brief and upload your branding files, Claude will create an interactive layout where each item can be changed one at a time.
Unlike most AI image generators, Claude design creates usable HTML prototypes, presentation decks as well as coding that can be sent to Claude Code to function as finished websites. There is a big difference for a solo founder, freelance designer, or marketing professional needing to produce actual finished products quickly.
How does Claude design actually work?
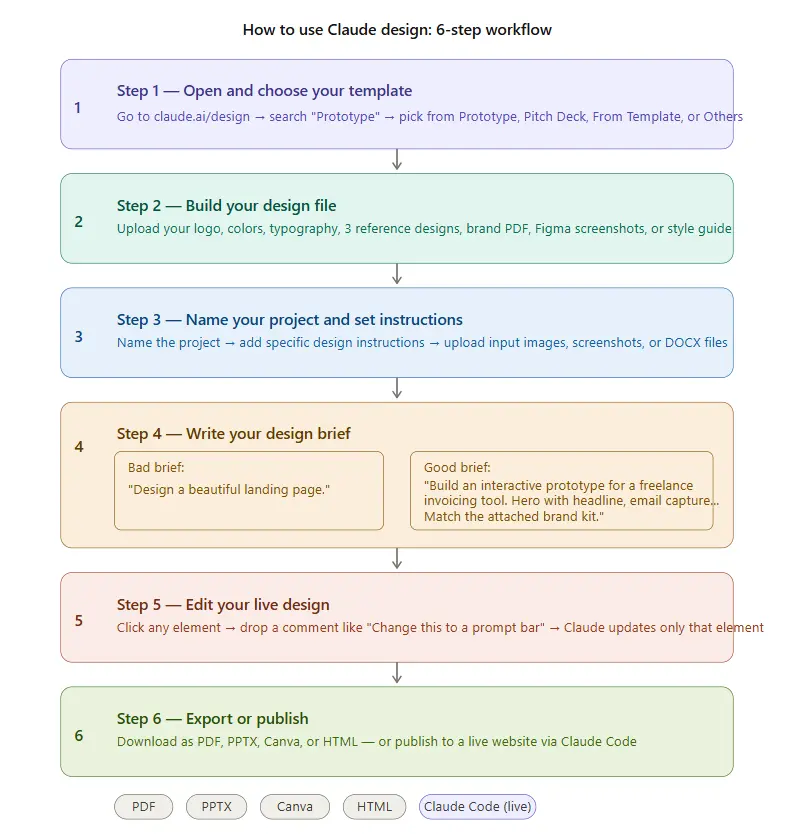
The entire process has six specific phases. Follow them and you will receive an image design that corresponds to what you like, rather than an AI-generated default image design.
Step 1: Use the Tool and Select Template
Go to claude.ai/design and select Prototype in the left sidebar. Four options will appear for Prototype, Pitch Deck, From Template, and Others, choose a selection that aligns with your purpose.
Step 2: Create a Design File
This is the difference between satisfactory results and excellent design work. Upload your logo, brand colour scheme and typography. Add three designs that you consider to be the defining examples of graphic design. In addition to uploading your example designs, you may also upload reviews, Figma links, old designs or a web page URL where you have added these same elements.
Step 3: Create Title for Project and Provide Design Direction
Create an appropriate title for your project, and write accurate details about your preferences for the design of your graphic, as well as any tone or other restrictions there may be. You can then upload your example files such as an image, screenshots, DOCX or URL of the web page a project exists on.
Step 4: Develop a specific design brief
This is the most critical step in the entire process.
Examples of Good and Poor Design Briefs.
Poor design brief: “Design a nice-looking landing page.”
Good design brief: “Design an interactive (clickable) prototype of a landing page for a freelance invoicing tool with a hero image containing an H1 and H2 for email capture and a screenshot of the tool on the right… followed underneath by a row of three features (icons), a pricing area (three tiers), a testimonial carousel, and a footer (social media/terms of service, etc.). There will also be a sticky navigation (top of page) with options for features, pricing, logging in, and starting trials. Be sure to follow the attached brand guidelines!”
As you can see in the good example, Claude knows exactly what sections of the prototype need to be created, how the sections should be laid out and organized, and how to create interactive elements. In the end, your first draft will be much more aligned with your vision if you are specific.
Step 5: Edit the live design
Once you see your design rendered, you don’t have to rewrite your entire brief in order to make a change. Just click any element on your canvas and leave a comment about that element like “This should be a prompt bar instead of a prompt box.” Claude will only change that specific element. Everything else in the design will remain until you’re done changing all the elements and are able to export it.
Step 6: Export or publish
When design is complete, you can download your document in one of four formats: PDF, PPTX, Canva OR HTML. If you want to publish as a live website, you can do so instantaneously with just one click and it will publish onto Claude Code.
How to write a brief that makes Claude design better
Many users end up with weak outputs as a result of vagueness in their brief; they think writing a brief is the same thing as writing a wish list where there are no guidelines. To fix this issue, all you need to do is treat your brief like a specification document (spec) instead of a wish list.
Therefore, when writing your brief, follow these guidelines:
- List components: List out all the sections that the page will have – hero, features, price, and footer section.
- Layout: Specify what is beside each other on the page (ex. hero image on right of page, product image on right of page).
- Interactions: Create a list of all the interactions on the page (ex. Sticky Navigation Bar, Testimonial Carousel, Email Capture).
- Brand: Always refer back to the Brand File that you will upload or state that the deliverable ‘will match the attached brand guidelines’
Bonus tip: Talk about what you do not want to happen. If you have seen examples of layouts from AI that you do not like, let them know that (ex. No Centered Hero Text, No Purple Gradient Background, No Generic Stock Images).
Claude design vs. building in Figma or Canva: which one makes more sense?
This depends on your workflow stage. Here is a simple breakdown:
| Situation | Best Tool |
|---|---|
| Need a quick prototype to test copy and layout | Claude Design |
| Need pixel-perfect final assets for a developer | Figma |
| Need social media graphics or presentations fast | Canva |
| Need a live HTML page without a developer | Claude Design + Claude Code |
| Need a fully designed component library | Figma |
How can beginners start using Claude design effectively?
Use a template for your first session. Rather than start from scratch, use the Prototype template and copy an image of a reference design into it and write three sentences about it. Getting a result first before increasing the complexity of the prompt will save time.
After the output is available, use the comment function on the element you would like to refine by changing one thing at a time so you can determine which aspects of your prompt yield the best results.
Create a library of personal prompts by saving the briefs used to create designs you like so you can use them for future projects. Eventually, you will develop a set of starting points that suit your taste- building on proven techniques like these best Claude tips and tricks.
Is Claude Design worth paying for?
- Claude Design is included within Claude subscriptions (no separate pricing)
Plans:
- Pro: $20/month (or ~$17/month annually)
- Max: Starts at $100/month (for higher usage)
Access:
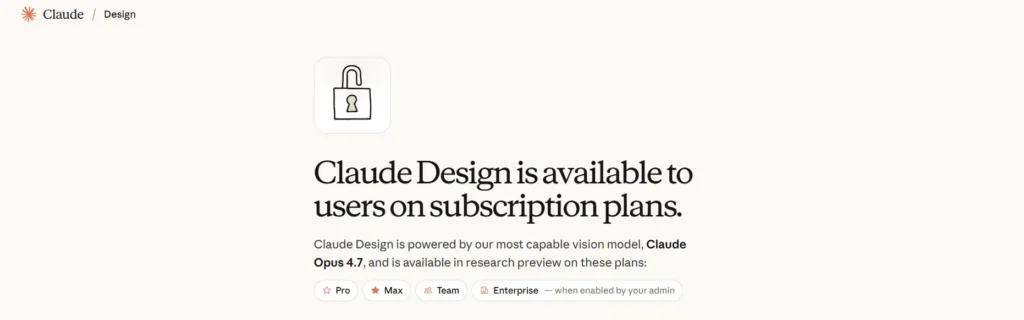
- Available on:
- Pro
- Max
- Team
- Enterprise
Who should pay for it:
- Independent founders who are building prototypes
- Marketers who need to create landing pages and presentations
- Product managers who need to make rapid prototypes
Why it’s useful:
Not only can you create prototypes from prompt → to prototype → to actual code from 1 application;
But you can also create real output from the text generated by Claude Code in approximately 40% of the time it would take to create something traditionally through design and Dev workflow. Something that becomes clearer when you understand how different Claude models handle reasoning and code generation, as explained in this Claude AI models comparison guide.
Free alternatives to Claude Design
- Canva Free Plan: Create Social Media Graphics (simple layouts), Presentations and More.
- Framer (no-cost option): Build and Publish Websites with Basic Functionality;
- Banani: Generate AI Layouts via Prompts.
Bottom line:
- Free tools are enough for basic use
- Claude Design is better for:
- Interactive prototypes
- Live publishing
- Consistent, scalable design workflows
FAQs
Yes. Beginners can start with templates and simple prompts, then refine designs using the edit and comment features.
Yes. It can generate interactive HTML prototypes that can be published or exported and further developed using Claude Code.
Claude Design focuses on generating interactive prototypes from text prompts, while Figma and Canva are manual design tools.
No. Clear prompts and reference files are enough to generate usable designs, though better inputs improve results.
Yes. You can click on individual elements and modify them without changing the entire design.
It works best for prototypes, landing pages, pitch decks, and quick design iterations.
Key Takeaways
With Claude design you have a complete design process all with one AI tool. The quality of what you create will depend heavily on how detailed and clear your brief is, as well as what reference files you provide to Claude. Make sure to write an accurate description of each part of the brief. When uploading your brand identity documents make sure the original file was used in real life. You can change things on an element basis instead of having to redo the whole project from scratch. When it comes time to export your project you will have the option to use any format that fits with the next step in the design process.
Simply put, when you provide Claude design with enough context about your project, then it can create something more closely matching your style.